
Real-World Ducting Setups for the ZERO BREEZE Portable AC
Wondering how to install ducts for your ZERO BREEZE Mark 3? You're not alone. Fortunately, many users have already figured it out and shared their clever setups with us. In this guide, we'll walk you through the most common questions and showcase real-world examples to help you find the best ducting solution for your needs.
Top Questions About Installing Mark 3 Ducts
When it comes to duct installation, users often have several questions. Here are some of the most frequently asked ones:
- Is it necessary to install ducts?
- Which ducts should I install for my setup?
- Where should I install the ducts? Do I need to drill holes?
Key Principles for Efficient Ducting
While each setup is different, most users follow two general principles when installing ducts:
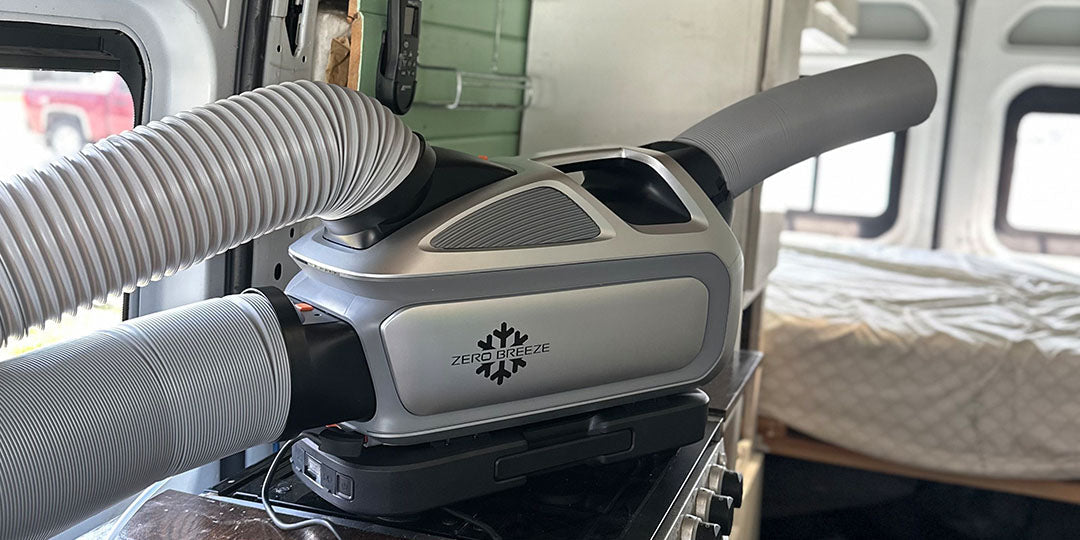
- For an open environment: The front air outlet duct can be installed for more targeted cooling. This setup allows you to use the Mark 3 as a spot cooler in outdoor spaces.
- For an enclosed space: Make sure the front and rear intakes draw air from different sources. The front ducts deliver cool air into the space, while the rear ducts exhaust hot air outside. Drawing air from the same enclosed area can reduce cooling efficiency and cause hot air recirculation.
Ducts allow you to extend the range and flexibility of your Mark 3 AC without sacrificing cooling performance.
For more in-depth explanation of the dual-duct system, check out our blog post: Why the ZERO BREEZE Mark 3 Uses a Dual-Duct System
User-Tested Mark 3 Setups That Actually Work
Now that you have an understanding of the basic principles, let's dive into real-world examples shared by our users. These setups will give you inspiration and insights into how to set up your Mark 3 duct system in various environments.
Boat Setup
@Jay Swan:
"The exhaust on the condenser side goes out through the anchor locker. The rear intake hose takes air from the anchor locker. Keep it as short as possible to hopefully help efficiency."

"Installed the MK3 in my boat today. Used marine water tight inspection covers for the hoses. The hoses fit tight in them and won't require anything to hold them in."

"Absolutely the #1 way to cool a Vberth in any boat with A/C! Cooled the Vberth in my Ranger Tug R-27 (NW Edition) from 90 degrees to 69 degrees in less than 30min using less than 200w… Sweet!"

Rooftop Tent Setup
@Rob Nelson:
"I’m loving the Mark III for Texas spring and summer camping. Two out of the three times I’ve used it so far, it was raining, so I just had the M3 inside the tent with the exhaust and drain coming out. When I could, I had the M3 outside with the ac and return air ducts going through the windows. I zip up all the windows/doors when in use. It has been fantastic. The main reason I got it is for an annual 4th of July camping trip we go on in central Texas at 100 degrees every year. It’s the least I could do for my poor wife, that continues to join me. 😀"

Truck Camper Setup
"I’ve finally got my setup complete. My truck camper has a nice flip up window right next to where the air conditioner sits, so it made more sense to me to install it as a window air conditioner instead of strictly as a portable air conditioner.
I built a small holding shelf that has heavy duty drawers on it so that I can push the air conditioner into and out of the vehicle very easily as soon as we park. With this set up all I have to do is prop the window open on a small stick and then extend the drawer. Close down is similarly easy in that all I have to do is pull the drawer back inside and shut the window.
The main insulation is a piece of 2.5" thick closed cell foam, cut to fit the AC. I have a second piece under the shelf to close off the air from leaking that way."

Minivan Setup
"2016 Sienna Minivan Setup. Using a WeatherTech window cover as a template, I cut a 2" closed cell foam block to size. Nice snug fit! Covered with Bug screen. Cranking at full blast, as the van bakes in the Florida sun. It ran for about 2 hours on full blast, max fan. Did a nice job cooling the Sienna."

"Loving my Mark3! Definitely, twice the cooling. Sure thing!"

"Here's my Sienna minivan camper setup. That's how I hope to leave it. While camping in the mountains at 5500ft, day time high temperatures of 90°, and sunny, it worked well as a personal cooler, but could not cool the space within the minivan camper with poptop in the up position. I realize that might be asking too much of it. Since then I have insulated the exhaust duct which was radiating too much heat (117°) into the camper. I have also ordered insulated blackout curtains which I will use to partition the sleep area from the rest of the van and open poptop. We are having very hot days here in Las Vegas with Temps around 110° and it still does an acceptable job of cooling while parked in the hot garage with no sun beating down on the camper."

Golf Cart Setup
@David Martin Hall:
"Got mine today and just the single hose to direct the output. Works well."

@James Callison:
"I am using my Mark2 in my golf cart. It's perfect. I added PVC fixtures to allow me to easily direct air flow to me or my partner."

Semi-Truck Setup
@Jordan Bar:
"Yes it's expensive, but compared to a 12K APU, it's worth it and must have to every OTR and Regional truck driver. Yes it does take place; I had to remove the passenger seat and I also bought the breezway window screen to run both hoses through, but not  poking the screen so bugs don't get in."

@Fang:
"I am a long-distance truck driver, and I want to say that the Mark 3 does what the official propaganda says, and my experience is very good! And I will recommend it to my truck driver friends around me!"

Find the Setup That Works for You
As you can see from these user setups, there are a variety of ways to install ducts depending on your environment and needs. Whether you're setting up on a boat, in a rooftop tent, or in a truck camper, there's a solution for you. If you're still unsure about how to set up your own Mark 3 ducts, don't hesitate to reach out.
Share Your Mark 3 Setup with Others
If you've got your own Mark 3 setup and want to help others who are unsure about theirs, we'd love to hear from you! Send us your photos and setup details to content@zerobreeze.com.
Join Our DIY Window Panel Trial Program
If none of the above use cases match your needs, we're running a DIY window panel trial program. Interested? Email us at content@zerobreeze.com with the following details:
- A short note about your Mark 3 experience.
- A few photos of your Mark 3 setup in action, including how you're venting the air.
We'll help guide you through it!


Leave a comment